Cloning Cassandra Clusters The Fast Way
Cloning Cassandra clusters is not something that is talked about in the community a whole lot. Do a quick google search on “Clone Cassandra” and there aren’t many hits. Mostly just the DataStax docs and a few StackOverflow questions. Albeit, it’s just a practice in backup and restore, but it’s still a valid edge use case. The good news is, if you’re taking backups, you’re halfway there. This post will walk you through the steps to clone your cassandra data the fast way.
Why Clone
Why on earth would you want to clone your cassandra data? Honestly, there aren’t a whole lot of reasons. The first one that comes to mind is needing an exact copy of production to use for development or testing. Another use case is changing data location, i.e. switching from on-premise to a cloud provider or from one cloud provider to another. Sometimes, there’s no better reason other than to have a DevOps fire drill. Being prepared to move at a moment’s notice is a pretty powerful ability. You never know when the proverbial poo will hit the fan.
Clone Overview
The steps to clone are a combination of back-up and restore with a few configuration settings.
Source cluster:
-
Per node, backup existing cluster’s data, schema, & token assignment
Destination cluster:
-
Create schema on new cluster
-
Assign existing tokens by adding initial_token setting to cassandra.yaml
-
Add auto_bootstrap setting to cassandra.yaml
-
Add load_ring_state JVM setting to cassandra-env.sh
-
Restore data to correct nodes
Backup Existing Cluster
If you’ve been running Cassandra at all, you should be familiar with how to take snapshots. If not, check out our prior post on the subject. For continuity of this post, I’ll do a quick recap of the steps needed for our current needs.
Backup Data
First, take the backup, aka snapshot, and give it tag so that you’ll be able to identify it later. This is going to flush all the data that are currently in Cassandra’s mem-tables out to disk. Then it will create hard-links to the physical sstables data files into a new folder labeled as your snapshot tag. The new folder will be created under the path of each keyspace/table/snapshots directory.
$ nodetool snapshot -t my_snapshot_tagPersonally, I like to use the UTC formatted in a human readable format as the snapshot tag.
$ tag=$(date -u +%Y-%m-%d_%H-%M)
$ nodetool snapshot -t $tag
Backup Schema
Second, save the current schema as a flat file. In order to restore the backed up data, we’ll need to know what the schema looked like at the time of the backup. The cqlsh utility has a nice feature that allows us to execute a snippet of cql that is passed as a command line parameter. The cql command “DESCRIBE SCHEMA” will output the current schema. Then, we need to redirect the output of the cqlsh command to a flat file.
$ cqlsh -e 'DESCRIBE SCHEMA' > /tmp/schema.cqlBackup Tokens
When planning on cloning your data into a new cluster, you’ll need to take an additional step during the backup. The existing cluster’s token topology is important to preserve for this particular use case. You’ll need to extract the tokens on each node and store them with the backup. When using vnodes, there are 256 tokens (by default) per node. Planning ahead, we’ll need the tokens saved as a comma, separated list of the values. The nodetool utility will display all the tokens in the cluster by issuing the ring command. With a little grep-ing and awk-ing, we can get the tokens formatted as we require.
$ nodetool ring | grep 0.0.0.0 | awk '{print $NF ","}' | xargs > /tmp/tokens.txt(NOTE: Replace the 0.0.0.0 with your IP that is listed as the broadcast_address from cassandra.yaml, whether that be the public or private IP.)
The output of the above command will take each of the token values and string them together with a comma between them into a single line. But in order to use them during the restore, we’ll need to have it formatted slightly different. It makes sense to go ahead and store it the way we need it, right? The format we will need is “initial_token: token_value, token_value, token_value”. Of course, there will be 256 “token_value”s in that string, but you get the idea. Let’s add the prefix and remove the trailing comma.
$ nodetool ring | grep 0.0.0.0 | awk '{print $NF ", "}' | xargs | cut -d '=' -f 2 | sed 's/,$//' | sed 's/^/initial_token: /' > /tmp/tokens.txtThis little one-liner will give you exactly what you need later. You’re welcome.
Upload to Off-Site Storage
Taking a backup of all of the above items is good, but it won’t help you if your machine isn’t reachable. Always store your backup data to an off-site storage site. There are so many options available in the inter webs, this should be a simple step. Your storage should organize all of the backup data by cluster, then node, then snapshot tag. By keeping it ordered, you can easily navigate your backups when the time comes.
Restore to New Cluster
Restoring to a new cluster is synonymous with cloning to a new cluster. The idea is that you’re moving all of the existing important stuff so that you can have a copy running in a new cluster. There are quite a few steps that have to be taken to get the new cluster ready. And you’ll also be bouncing the Cassandra service quite a few times. This is to get settings to take affect in a particular order. Just don’t deviate, as each step builds on the last. Most all of these steps can take place in parallel on all nodes at the same time. But they do have to happen in sync on the nodes. This means do each step simultaneously on each node.
Create Destination Cluster
Cloning of a cluster only works if both the source and destination clusters having the same number of nodes. How you select the size/power of your machines is irrelevant to the clone. The only thing that matters is the quantity of nodes match. You’ll need to spin up a new cluster.
Stop the cluster
Yep, I know we just create new cluster, but we’re going to stop the Cassandra service on all of the nodes. We’re going to be cleaning up all of the new cluster data’s default settings. We just have to get Cassandra to stop watching what we’re about to do.
$ sudo service cassandra stopDelete system keyspace data files
Seems scary, right? All of the important Cassandra metadata about itself is stored in the system keyspace. And we’re going to blow it all away? It’s all ok, though, because when the Cassandra service starts back up, it’s smart enough to recreate all the necessary metadata keyspace information based on it’s settings that we’re about to change.
$ sudo rm -rf /var/lib/cassandra/data/system/(NOTE: this folder may be in a different location in your cluster depending on what your data_file_directories value is in the cassandra.yaml)
Add auto_bootstrap
When Cassandra starts back up, we don’t want it to try to bootstrap itself right away. We need to add a line to the cassandra.yaml so that doesn’t happen. This single line contains the following setting, “auto_bootstrap: false”. Normally, having this setting omitted from the yaml defaults to a true value. The simplest way to do this is with the following one-liner.
$ sudo sed -i '$ a\auto_bootstrap: false' /etc/cassandra/cassandra.yaml(NOTE: this folder may be in a different location in your cluster depending if you install Cassandra from a package or tarball)
Download token file
Remember that token file we created during the backup of the existing cluster? We need to get that file from the off-site storage location. I typically download it to the /tmp/ folder since we won’t need it again.
Add initial_token
Now that we have the token file local, we can use it’s data. We just need to add the contents of the file to the cassandra.yaml file. Aren’t we glad that we pre-formatted the contents to be exactly what we need? Yeah, me too.
$ tokens=$(cat /tmp/tokens.txt)
$ sudo sed -i '$ a\$tokens' /etc/cassandra/cassandra.yaml
(NOTE: this folder may be in a different location in your cluster depending if you install Cassandra from a package or tarball)
Add load_ring_state
Within the options that are sent to the Java Virtual Machine, we need to tell the cluster to not try to figure out the ring state. We do this by adding a JVM option, cassandra.load_ring_state=false, to the cassandra-env.sh file.
$ sudo sed -i '/JVM_OPTS="$JVM_OPTS -Dcassandra.load_ring_state=false"/d' /etc/cassandra/cassandra-env.shStart the cluster
We need to start the cluster back up so that the previous two steps can take hold. When turning a cluster on, you need to start with the seeds, and then proceed to the non-seeds. Always wait about two minutes after starting each node to make sure that the service has joined the ring and is listening for clients.
$ sudo service cassandra startDownload the schema file
The schema from the existing cluster needs to be created on the new cluster. The schema.cql file that we created and stored off-site needs to be downloaded to just one node. I typically store the file in a /tmp folder as we won’t ever need it after it’s used.
Create the schema
We have to execute the schema.cql file against the new cluster. The cqlsh utility has a command line parameter that accepts a text file to be executed. Once the schema has been created, Cassandra will create the necessary folder structure for storing the data files.
$ cqlsh -f /tmp/schema.sql(Note: the location of your schema.cql file will depend on where you chose to downloaded it)
Stop the cluster
Now that we have the necessary folder structure in place for the data files, we can stop the cluster. We will soon be downloading the backed up data files. Cassandra needs to be turned off so that it doesn’t attempt to read them while the download is happening.
$ sudo service cassandra stopDownload the backup data files
We need to download all of the data files from the off-site storage. The data files will need to be placed into the correct locations according to the schema that we created earlier. Each keyspace & table in the schema has it’s own /folder/subfolder that data files need to go into. When Cassandra creates data files, it formats them with a keyspace-table prefix. This makes sorting and organizing much simpler. It’s up to you how you do the download and placement. I like to query Cassandra’s system keyspace to get the list of keyspace & tables. Then loop through that list and place the files accordingly. Of course, if you do chose to query Cassandra, then you would need to have it still running.
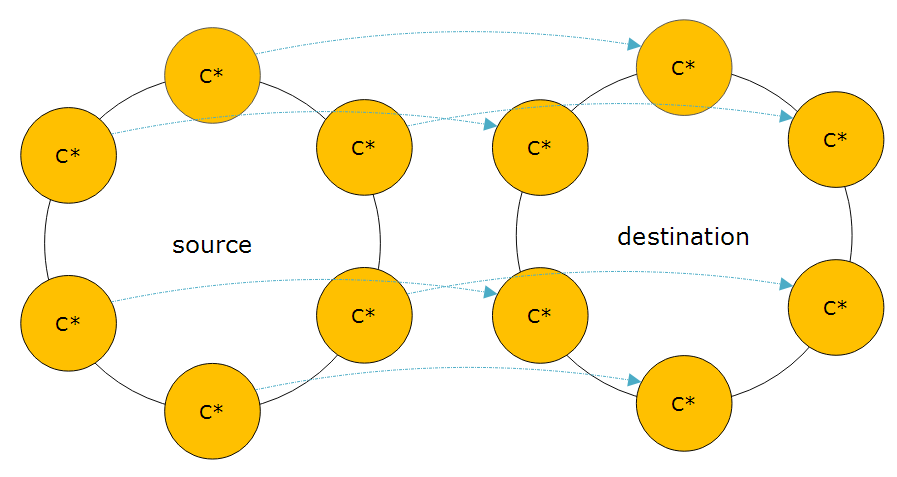
The data from each node in the source cluster must map to one node and only one node in the destination cluster. Looking at the diagram above, the node at the top of the left cluster will map to the node at the top of the right cluster. Follow that same pattern as you move around the cluster.
Start the cluster
Now we have all the configuration settings in place and all of the data files in their respective folders. The last step is to start the cluster back up. This will take a little bit longer to start since it has new data files to discover. Once it’s up and running, you should be able to run queries against it to verify that all of the data from the existing cluster is now in the new cluster.
$ sudo service cassandra startThe Fast Way?
The title of this post says that this is the “fast way”. How can that be? That was a ton of steps to take to clone a cluster. The alternative way to clone a cluster involves using the utility SSTableLoader. SSTableLoader reads in every data file and writes the data to the correct node according to the token assignment. This takes a while to accomplish because every piece of data has to go through the entire write path. What makes it super slow is that it will write the same piece of data how ever many times that your replication factor is. This method also requires more disk space than the original cluster, as it will need to compact all of the data after the load. So if you’ve got roughly 200 GB per node and a replication factor of 3, you can easily hit 1TB on that node before it gets all inserted. Once repairs and compaction occurs, the node will settle down to the original 200 GB. This method does work and a lot of people chose to do it this way. It’s just slow and take a lot of extra disk to accomplish.
Summary
By now you should understand all of the steps necessary to clone your Cassandra cluster the fast way. Please attempt to recreate all of the steps in your own environment. If you have any questions, please don’t hesitate to reach out to me for questions.